
How to Setup an AWS Instance, Docker, and Jupyter (The solution to "it only works on my computer" problem)
How To Get a BASH shell in Windows, Set Up an AWS EC2 Instance to Run in that Shell, Install Docker in that Instance, and Run Jupyter Notebook in Docker
What is Jupyter and Why Do You Want to Use Jupyter?
Jupyter is a really convenient notebook that you can share with others, particularly people working on something with you. It is a standard in industry and academia. Jupyter can run forty programming languages.
Why run Jupyter on Docker?
We want to run Jupyter on Docker because (1) Docker will automatically install updates for Jupyter and (2) in case we work with data sets that our laptops can’t handle, we can run it on an Amazon Web Services E2 machine. Installing Docker on Windows is cumbersome, so Windows users install Git Bash (Born Again Shell). Ultimately, we will run Jupyter in our Docker shell which will run in our AWS shell which will run in Git Bash; Git Bash > AWS > Docker
Steps
Install Git Bash (if on Windows)
If on Windows, install Git Bash. Go to git-scm.com. The rest is self-explanatory
Go to aws.amazon.com and create an account if you don’t have one already
Configure a Key Pair
In your bash shell, run
ssh-keygen -t rsa.
When it asks you to enter a file in which you want to save the key and a passphrase, just provide nothing ie just press Enter.Unless you really need to make your data really secure or something. Security wasn’t a concern in class. Verify your newly created ssh-key by running
cat ~/.ssh/id_rsa.pub
This should output something that looks like the following. (I don’t use this key so it’s not possible to hack any of my stuff with the ouput below.)
ssh-rsa AAAAB3NzaC1yc2EAAAADAQABAAABAQDIN8mZglB4XWCtv/VyErkvCa/RrOgRd6pVomXyisWrsNLeSbZdpGxMu6EseY/u4CIPRb1caz3PgU0p5vg7qJ+65Jp0OxtSYy7xu/CPyMcDkUEsvHRILKg0aPNzTj2vNP3vD7ceXZAAvaPhAJ3Cl66lgTTNyw6aELF9J1eJvqwSBlxY9Csva+QmFui5SY7jn+ft7w5i8Dkfm/6Wrl92BIkRZUJX9Vks/HmQvmGKIA3NY1jdcFLUgrBVe7wzBbTif+8S3+Xte//UDA7SmI3+JHzX1JnPxWxaHABQWBhFikfryJDx8IHK6iMaZYxbiDh2nw2pY+JkoWZNTGlPN+F2fYft
Go to AWS > EC2 > Key Pairs > Import Key Pair. Set name to whatever you’d like. For this class, you set the name to jan_2018_unex_213. Copy (i) and paste it into the Public Key Contents input box. Press button Import. When you try to connect to AWS in Git Bash on your computer, AWS will look for the private key in your computer that matches the public key.
Create a New Security Group
AWS > EC2 > Security Group > Create Security Group > Add Rule. Make sure that the Inbound tab is selected because you are created Inbound rules. Each rule has four fields: Type, Protocol, Port Range, and Source. In class, I setup security group name to ucla_data_sci and description as ssh jupyter docker mongo.
| type | protocol | port | Source | comments (not field in AWS) |
|---|---|---|---|---|
| custom | do not touch | 8888 | anywhere | Jupyter |
| custom | 2376 | anywhere | Docker hub | |
| custom | 27016 | anywhere | mongo (not db) | |
| SSH | 22 | anywhere | SSH | |
| HTTP | 80 | anywhere | did not create in class originally but UCLA would not let us connect to port 8888 for some reason |
Create a new EC2 Instance, Configure Docker, and Pull the jupyter/scipy-notebook Image using AWS CLI and AWS Cloudformation
AWS CLI and Cloudformation is much less manual, but has a startup cost. There is a post on how to setup AWS CLI.
Save Template
Save the template. The following is in yaml format.
# template can be in json or yaml format; usg yaml
# because yaml allows comments
# https://docs.aws.amazon.com/AWSCloudFormation/latest/UserGuide/aws-properties-ec2-instance.html

# A stack is a collection of AWS resources that you can manage as a single unit.
# All the resources in a stack are defined by the stack's AWS CloudFormation template.
---
# template can be in json or yaml format; usg yaml
# because yaml allows comments
# https://docs.aws.amazon.com/AWSCloudFormation/latest/UserGuide/aws-properties-ec2-instance.html

# A stack is a collection of AWS resources that you can manage as a single unit
# All the resources in a stack are defined by the stack's AWS CloudFormation template.
---
AWSTemplateFormatVersion: '2010-09-09'
Description: "UCLA-specifications"
# Resources Sxn is the only required section
# Resources Sxn specifies the stack resources
# and their properties, such as an EC2 instance
# or S3 bucket. You can refer to rsrcs
# in the Resources and Outputs sections of the template.
Resources:
    MyEC2Instance:
        Type: AWS::EC2::Instance
        Properties:
            ImageId: ami-005bdb005fb00e791 #Ubuntu 18.04
            KeyName: april-2019
            InstanceType: t2.micro
            BlockDeviceMappings:
            # Lists start w/ -
              - DeviceName: /dev/sda1
                Ebs: #BlockDevice
                    VolumeType: gp2
                    VolumeSize: 30
            SecurityGroups:
              - !Ref MySecurityGroup
            UserData:
                Fn::Base64: !Sub |
                    #!/bin/bash
                    # bash cmds to be run the first time the instance is run
                    curl -sSL http://get.docker.com/ | sh
                    sudo docker pull jupyter/pyspark-notebook
                    # add Ubuntu usr to Docker grp so we don't need to
                    # sudo docker cmds
                    # /usr/sbin/cmd req'd for some reason.
                    sudo /usr/sbin/usermod -aG docker ubuntu
                    sudo reboot
    MySecurityGroup:
        Type: AWS::EC2::SecurityGroup
        Properties:
            GroupName: 2019-may
            GroupDescription: secruity group, simple low-level security, port 8888 for jupyter
            SecurityGroupIngress:
              - Description: jupyter
                IpProtocol: tcp
                FromPort: 8888
                ToPort: 8888
                CidrIp: 0.0.0.0/0
              - Description: ssh
                IpProtocol: tcp
                FromPort: 22
                ToPort: 22
                CidrIp: 0.0.0.0/0
              - Description: docker
                IpProtocol: tcp
                FromPort: 2376
                ToPort: 2376
                CidrIp: 0.0.0.0/0
              - Description: mongo (not db)
                IpProtocol: tcp
                FromPort: 27016
                ToPort: 27016
                CidrIp: 0.0.0.0/0
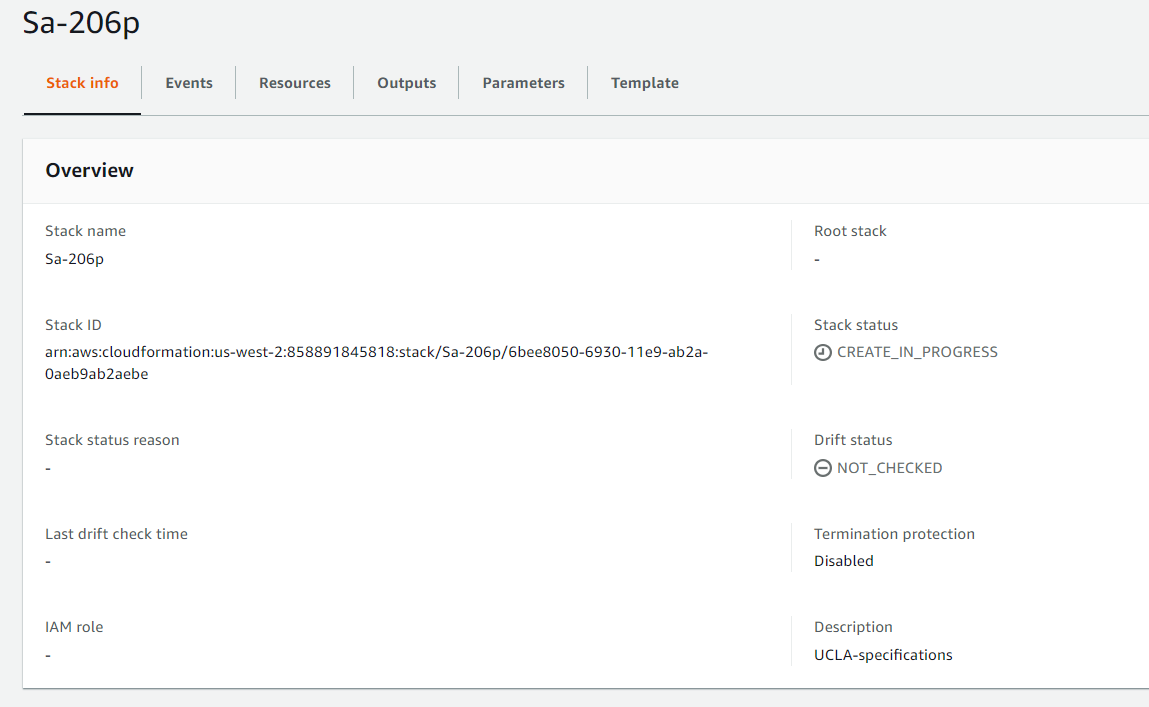
Create Stack
Run this command in Bash:
$ aws cloudformation create-stack --template-body file://./Sa-206.yaml --stack-name Sa-206p
{
    "StackId": "arn:aws:cloudformation:us-west-2:858891845818:stack/Sa-206p/6bee8050-6930-11e9-ab2a-0aeb9ab2aebe"
}
You can see that it’s worked by going to AWS management console > Cloudformation and management console > EC2.
From AWS documentation:
A stack is a collection of AWS resources that you can manage as a single unit. In other words, you can create, update, or delete a collection of resources by creating, updating, or deleting stacks. All the resources in a stack are defined by the stack’s AWS CloudFormation template. A stack, for instance, can include all the resources required to run a web application, such as a web server, a database, and networking rules. If you no longer require that web application, you can simply delete the stack, and all of its related resources are deleted.
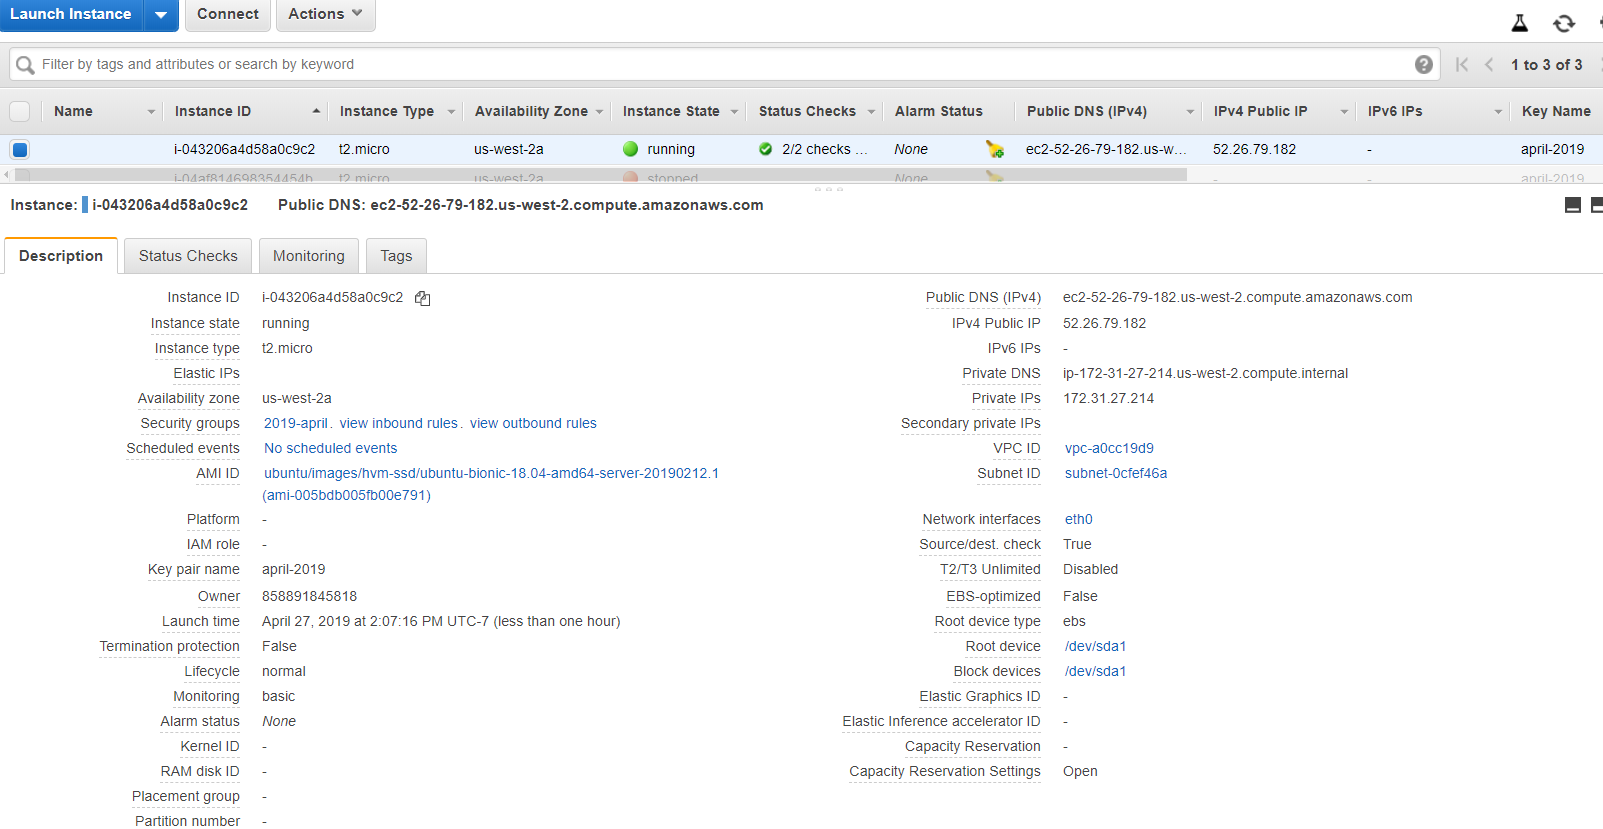
How to Manually Create EC2 Instance
AWS > EC2 Dashboard > Instances > Launch Instances > AWS will prompt you to “Choose AMI”. AMI stands for Amazon Machine Image which contains software you need to run your sandbox machine. Teacher recommended the latest stable Ubuntu Server release that was free. After selecting AMI, you’ll be prompted to “Choose Instance Type”. Select t2.micro which was sufficient for the class. After selecting instance type, you’ll be prompted to “Configure Instance”. You can do nothing and just go on to the next step and tab. The fourth step and tab is “Add Storage”. We opted for 30GB, the maximum amount that was free. The fifth tab, “Add tags”, we ignored. The sixth tab, “Configure Security Group”, was important. We selected the one we created in a previous step. Finally, AWS to take you to the “Review and Launch” page. You can verify that you selected the options that you intended to and click the Launch button.
Note About Jupyter Notebook Security
The security group that we set this instance to is open to the world. We are not that concerned about intruders. However, we do have some security in the form of tokens. You will see later that to run Jupyter, Docker will generate a security token that you will need to access your Jupyter notebook. The token is like a password.
Configure the New EC2 Instance for Using Docker
SSH into the EC2 instance you just created by running in Git Bash
ssh ubuntu@<ipv4 public address>
The ipv4 public address can be found in AWS > Instances. Copy and paste (Ctrl+Shift+Insert because Ctrl+V doesn’t mean paste in Git Bash) the IPv4 address. Git Bash will ask you if you’re sure about it. Type yes.
To install docker, run
curl -sSL http://get.docker.com/ | sh
The shell will tell you to run
sudo usermod -aG docker ubuntu.
Run that command. This adds the Ubuntu user to the Docker group. In order to force the changes to take effect, you need to reboot. Reboot by running
sudo reboot
Adding the Ubuntu user to the Docker group makes it so that sudo (short for super user do) is no longer required to issue commands to the docker client. We tested this by running
docker -v
which tells you which Docker version that you’re using.
Pull the jupyter/scipy-notebook Image
Run
docker pull jupyter/scipy-notebook
Docker pull
pulls an image or a repository from a registry. In this case, we are pulling the Docker image of jupyter/scipy-noteook from Project Jupyter’s public Docker Hub account. After pulling this image, you do not need to pull it again as it is not in your docker images cache. Anytime you run a new Jupyter container, Docker will load the container from the image in your cache. You can vaguely think of the image as a class and a container as an instance of that class. “Vaguely” because the teacher, Josh, says so in his book Docker for Data Science. I don’t know Docker enough to know how that’s only a vague analogy.
Run the jupyter/scipy-notebook Image
The command is
docker run -v /home/ubuntu:/home/jovyan -p 8888:8888 -d jupyter/datascience-notebook.
In class, we used 80:8888 in place of 8888:8888 because UCLA did not let us connect via port 8888. Port 80 is http. I just replaced the 8888 in the following link with 80. Bash will return a link to paste into your browser. It should look like this
http://localhost:8888/?token=fc8ff7effaefa09be57ba60a90b669c7f023ffe8c08d1e04 :: /home/jovyan
I replaced localhost with the ipv4 public address of my AWS instance. This is because in the browser, the local host is my computer. The host is the AWS shell.
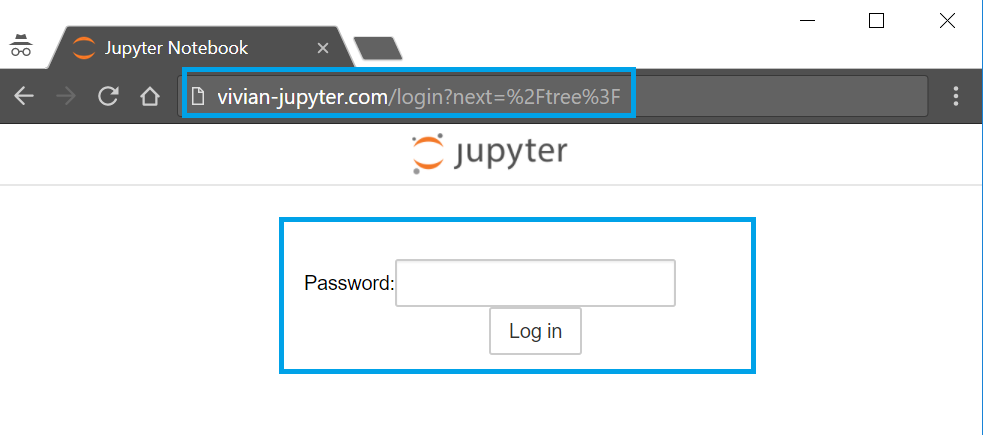
How to Setup Domain Name for Jupyter
If we only did what is outlined in How to Set Up an AWS Instance, Docker, and Jupyter, recall that we need the IPv4 address of our instance and our Jupyter notebook’s token to access our notebook. IP addresses and tokens are not memorable. Most people have to look up their addresses and tokens. However, we do not need our IP address and token if we associate our IP address with a domain name and setup a password.
How to Setup Domain Name
1. Buy a Domain Name
I bought a domain from the web hosting company 1and1 only for its promotional offer. In February 2018, you could get a domain for a year for only $1. Just go to 1and1.com and how to buy a domain name should be self-explanatory.
2. Set Your Domain’s IP Address to Your AWS Instance’s IPv4 Address
With 1and1, I just logged in 1and1.com and editted my domain’s DNS settings.